WordPress Tutorials For Beginners
WordPress Basics
[wp_objects_pdf]
WordPress enables website owners to update page content and operate a blog page through a friendly interface (avoiding the need to learn web design skills).
Before beginning, it’s really important to understand the difference between pages and posts.
Your website will consist of any number of web pages containing updatable content. One of the pages is the blog page (unless you’ve chosen not to run a blog/news page). The blog page can sometimes be set as the home page or it might be a completely separate page called News, instead of Blog.

Posts
The blog page of your website automatically lists individual stories (posts) added by yourself. These can be of any length – short punchy updates or incredibly long features or stories. It’s your choice…
Posts are often dated marked (and sometimes the post author is displayed also). They appear in reverse chronological order; as you publish new posts, older posts get pushed down the page. If you’re blogging a lot, it can help users if you categorise your posts. But speak to your designer about this first.
Your design will determine how many posts are listed on your blog page. If you’re showing too few or too many posts, there’s a simple setting to control this in the admin area. You might need to ask your web designer to change this for you.
Once a post drops off the bottom of the page, it can still be accessed using other methods (e.g. ‘Older Posts’ links and Archive pages). And of course, each and every post is individually indexed by search engines.
Pages
Pages are more permanent. Typical examples would be your home page, About us, Contact us, etc. Here’s a good explanation from WordPress.com:
Once you publish them, they stay put. They’re handy for timeless content, like an About or Contact Me section. This stuff probably isn’t going to change very often, and you want your visitors to be able to access it easily no matter where they are on your site. Your pages are displayed in a menu somewhere on your blog that’s always visible (usually up near your header or in a sidebar), so people can explore your site with ease.
Before updating your website, be clear in your mind about the task you wish to perform. Are you updating a page or a post?
Logging into WordPress
1. In your favourite browser, go to www.yourwebsitecom/wp-admin
It’s imperative to use a high quality browser such as Firefox or Chrome. Issues can arise with other browsers.
2. At the log in screen, enter your user name and password and click ‘Log In’
Forgotten your user name?
If you have forgotten your user name, you will need to contact your web designer for a reminder.
Forgotten your password?
If you have forgotten your password, click the ‘Lost your password?’ text link.
On the next page, enter your username or email address and click ‘Get New Password’. You should receive a link to create a new password via email.
If all else fails, contact your web designer who will be able to reset your password for you.
Using the Admin bar
If you can see the Admin bar (as shown below) you are already logged into WordPress and can click on your website name (in the Admin bar) to go to your Admin Panel.

Editing pages
You must be logged in to edit pages.
Method 1 – from the Dashboard
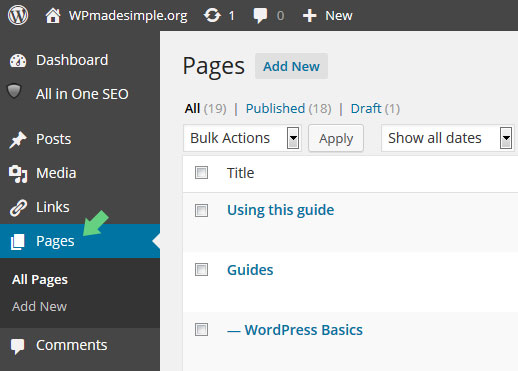
- Click Pages (left sidebar)
- Click the name of the page to be edited
- Edit as required and click the Update button
(don’t forget to do this!)

Method 2 – from the Admin Bar
- Go to the page to be edited (on the live website)
- Click Edit Page (top right of Dashboard)
- Edit as required and click the Update button

Writing Blog Posts
You must be logged in to write blog posts.
Don’t forget to categorise your blog post if required. Categories can be selected using the tick boxes presented.
Method 1 – from the Dashboard
- Click Posts (left sidebar)
- Click Add New
- Add a title and post content
Select a relevant category (if required) - Click the Publish button (don’t forget to do this!)

Method 2 – from the Admin bar

- Click New > Post on the Admin bar
- Add a title and post content
- Click the Publish button (don’t forget to do this!)
Adding images
- Before proceeding, log into WordPress and open the appropriate page or post for editing. Also, ensure that you know the name and location of the image to be added. Your image should be a JPG, GIF or PNG type file.
For example, it could be a file called beach.jpg and could be located on your desktop or in your Pictures folder. - Next, position the cursor carefully where the image is to be added. You are advised to position the cursor at the very start of a paragraph or heading (or blank line). It’s best to avoid positioning the cursor within text. You will be able to align the image relative to this position later.(This PDF training aid on inserting images may assist you also)

- Click the Add Media button (above the toolbars)
- Click Upload Files if adding a new image (or Media Library if adding an image already uploaded).
- Click Select Files and locate the file to be uploaded. WordPress will now import your image to it’s media library, ready to be used wherever needed.
- When the image has been uploaded, complete the options using the help notes further below. Then press the Insert into Page/Post button.
Add Media dialog box Options
- Title: A short text description of the image
- Caption: Not required unless your design supports the display of image captions
- Alt Text: Usually the same as the title
- Description: Usually not required
- Alignment: As required. None usually works better when the image is positioned on a blank line (paragraph). Left and Right works best when the image is being positioned with text or headings. The available text will wrap around the image automatically. Center is often avoided.
- Link URL: Leave blank (None) or select Media File if the image is to be linked to the full size version (this allows the user to enlarge the image). You can also link to any web address (URL) of your choice. This could be to another page in your website or an external web page.
- Size: Choose as required. If the sizes displayed are not appropriate for your design and layout, you may need to speak with your web designer. NB – If the image is too large for the containing element, this may cause the layout to break.
Changing the options after an image has already been inserted…
If you wish to edit the options for your image, click the image once and then click the ‘Edit’ button (pencil icon) which appears. Alignment options can also be changed quickly here. There’s also a button to delete an image (displaying a cross).

Another way to create image links
The Insert Link button on the Toolbar can also be used to create linked images (select the image first).
Pre-processing your images for insertion
(preparing in advance)
Images can (and arguably should) be prepared prior to insertion using software such as Adobe Photoshop Elements or similar. This gives you the added benefit of being able to adjust other qualities such as brightness, contrast, colours. And sometimes, cropping the image can be very useful. All of these tasks should be carried out in advance, prior to inserting your image into your WordPress powered website (in your favourite image editing software).
Some fairly primitive image editing options are built into WordPress (e.g. for cropping, rotating and flipping images). To access these features look for the Edit Image button in the Add Media box (seen during the upload procedure).

If you want to edit an image previously uploaded, go to your Media Library, click the image you wish to Edit and then use the ‘Edit Image’ button underneath the image.

The Media Library
All the images uploaded to your website can be viewed and edited in the Media Library. Click Media in the left hand navigation menu of the dashboard to view.
How to Add Links in WordPress Posts and Pages
WordPress comes with a user friendly post editor called the Visual Editor.
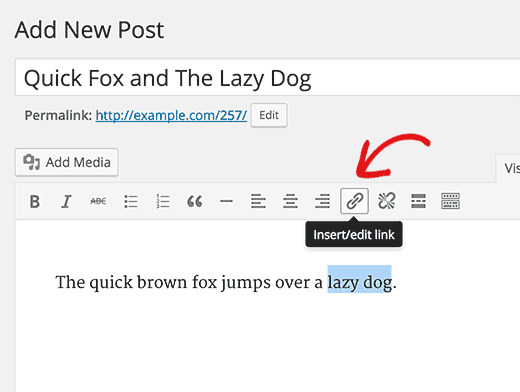
You can see the visual editor by going to Posts » Add New or by editing an existing post or page.
To create a link, you need to click on the Link button in the visual editor.

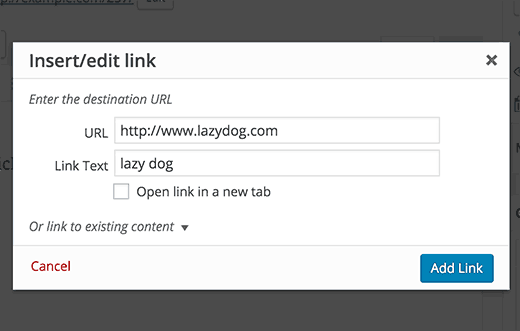
When you click on the insert link button, it will bring up a popup window. In the URL field, you will enter the actual hyperlink, and in the link text field you will add the text that will be linked.

You also have the option to check the box next to ‘Open link in a new tab’ option. This will open the link in a new browser tab. It’s recommended that you use this option if you are linking to an external site.
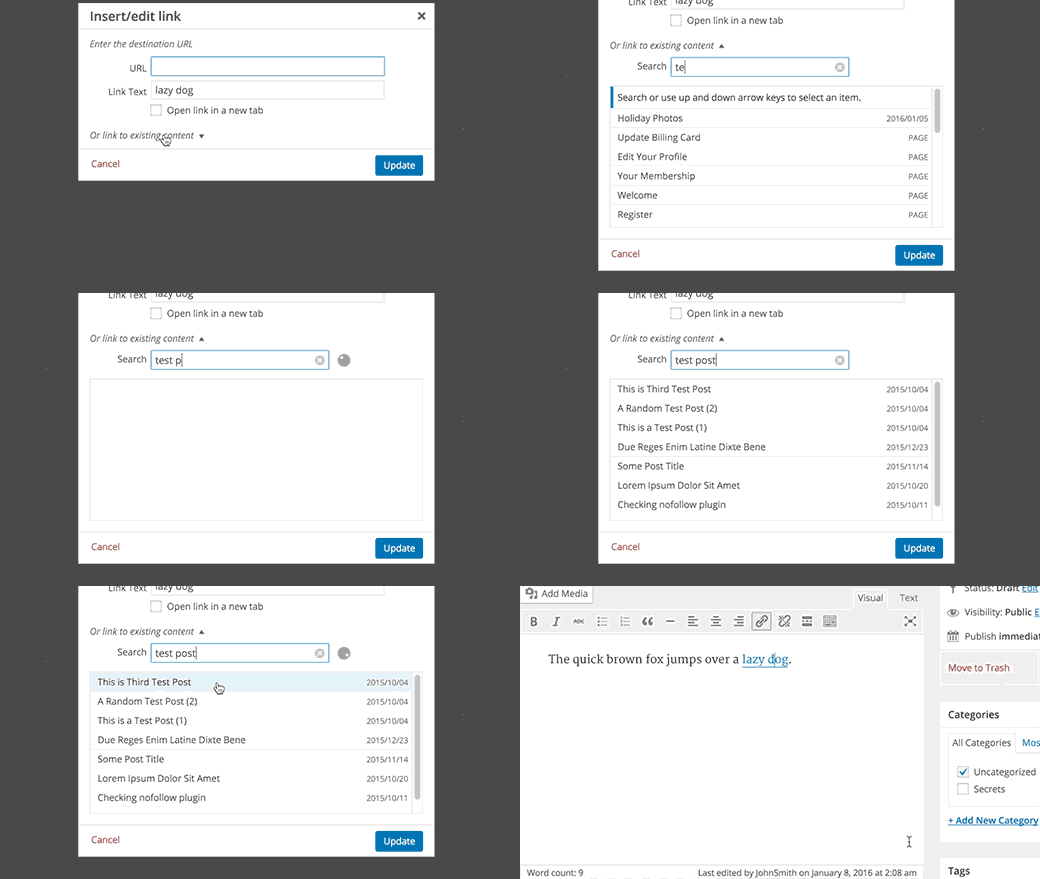
WordPress also allows you to quickly link to posts and pages that you have published on your own website by using the content search feature.
Simply click on ‘Or link to existing content’ option and WordPress will show you recent content and a search field.
You can search for a post or scroll down to find it from the list. You need to click on the post title to select it and then click on Add or Update Link button.

EXERCISES – For New Editors
- Write a post about yourself. Add pictures to the post
- Create a Page about your educational life
- Crete a Page about your religious life
- Create a page about your future dreams
- Create a page called About Me and link the 3 pages you have created already to this new page.

